
Quand il s'agit de faire des sélections dans Photoshop, il y a vraiment deux types de personnes - ceux qui savent utiliser l'outil Pen et ceux qui ont du mal. La plupart des gens retardent l'apprentissage de l'utilisation de Pen Tool aussi longtemps que possible, tandis que d'autres ne parviennent jamais à l'apprendre, pensant que c'est tout simplement trop confus, trop compliqué et tout simplement contre nature.
En fin de compte, leur travail dans Photoshop en souffre, car ils dépendent de l'outil Lasso pour à peu près tout ce qu'ils ne peuvent pas sélectionner avec les outils de sélection rectangulaire ou elliptique. Dans ce tutoriel Adobe Photoshop, nous allons mettre un terme à la souffrance. Nous allons découvrir à quel point il est vraiment facile de faire des sélections avec l'outil Pen.
Maintenant, quand je dis "facile", je ne veux pas dire que vous allez lire ce tutoriel et être instantanément transformé en Pen Master. Apprendre à utiliser l'outil Pen ressemble beaucoup à apprendre à faire du vélo. Une fois que vous aurez appris, cela vous semblera tout à fait naturel et vous vous demanderez comment quelqu'un pourrait ne pas savoir comment utiliser quelque chose d'aussi simple. Mais arriver à ce point nécessite un peu de pratique et d'efforts, et bien que vous lisez chaque livre, il y a sur la façon de faire du vélo peut vous apprendre les principes fondamentaux du fonctionnement des pédales, des engrenages et des freins, ce n'est que lorsque vous êtes sur le vélo en difficulté pour garder votre équilibre que le véritable apprentissage commence.
L'une des grandes choses à propos de l'outil Pen est que ce n'est pas quelque chose d'exclusif à Photoshop. Loin de là! Pratiquement tous les programmes de retouche photo, de graphisme et de mise en page populaires utilisent l'outil Pen sous une forme ou une autre, donc une fois que vous aurez appris à l'utiliser dans Photoshop, vous aurez déjà une bonne compréhension de la façon de l'utiliser dans de nombreux d'autres programmes aussi!
Où puis-je trouver l'outil Pen?
Avant de commencer à parler de l'outil Pen ou de la façon de l'utiliser, nous devons d'abord chercher où le trouver dans Photoshop. Vous trouverez l'outil Plume dans la palette Outils, regroupé avec les outils Forme, l'outil Texte et les outils Sélection du chemin (la flèche blanche) et Sélection directe (la flèche noire) (voir l'image à gauche).
Outil stylo de Photoshop
Bien sûr, cela peut poser la question de savoir pourquoi, si nous pouvons effectuer des sélections avec l'outil Plume, n'est-il pas regroupé avec les autres outils de sélection (l'outil Rectangle de sélection, l'outil Ellipse de sélection, l'outil Lasso, etc.) à le haut de la palette d'outils? Pourquoi est-il là-bas avec ces autres outils qui ne sont clairement pas des outils de sélection?
C'est une excellente question, et il se trouve qu'il y a une réponse tout aussi excellente pour y répondre, que nous verrons dans un instant.
Pourquoi est-il appelé l'outil "Pen"?
L'une des premières pierres d'achoppement pour apprendre à utiliser l'outil Pen, comme avec beaucoup d'autres choses dans Photoshop, est son nom, car après tout, s'il y a une chose que tous ceux qui ont essayé de l'utiliser savent, cette chose n'est pas un stylo. Du moins, pas le genre de stylo auquel vous pensez normalement lorsque vous entendez le mot "stylo". Essayez d'écrire votre nom avec de la même manière que vous pourriez signer votre nom sur un morceau de papier avec un stylo et vous vous retrouverez probablement avec un désordre tordu et emmêlé et des choses en boucle les unes sur les autres (bien sûr, je suppose que pourrait très bien être la façon dont vous signez votre nom).
 Pierre Bezier
Donc, s'il n'agit pas comme un stylo à encre traditionnel, pourquoi est-il appelé le Pen Tool? Le Pen Tool a en fait été appelé plusieurs choses au fil des ans, et par cela, je ne veux pas dire le genre de choses que vous avez pu appeler dans des moments de frustration. Vous l'avez peut-être entendu parler du stylo Bézier ou de l'outil Bézier, et c'est parce qu'il a été créé par un homme du nom de Pierre Bézier (c'est lui à gauche), un ingénieur français et un gars intelligent tout autour qui est venu avec le des mathématiques sophistiquées qui alimentent l'outil tout en travaillant pour le constructeur automobile Renault (le Pen Tool a été créé à l'origine pour aider à concevoir des voitures).
Vous avez peut-être également entendu l'outil Pen appelé l'outil Paths, et c'est vraiment le nom le plus approprié. L'outil Plume consiste à dessiner des "chemins". Pour effectuer des sélections avec l'outil Plume, nous convertissons simplement le ou les chemins que nous avons tracés en sélections. Mais cela commence toujours par un chemin.
Plugin Shortcodes, Actions et Filtres: Erreur dans le shortcode (ads-basics-middle-2)
Qu'est-ce qu'un chemin?
Honnêtement, un «chemin» est quelque chose qui peut sembler un peu déplacé dans un programme comme Photoshop. La raison en est que Photoshop est principalement un programme basé sur des pixels . Il prend les millions de minuscules pixels carrés qui composent une image numérique typique et fait des choses avec eux. Les chemins, en revanche, n'ont absolument rien à voir avec les pixels, c'est pourquoi j'ai dit qu'ils peuvent sembler déplacés dans un programme utilisé principalement pour éditer et dessiner des pixels.
Un chemin n'est rien de plus qu'une ligne qui va d'un point à un autre, une ligne qui est complètement indépendante et qui ne se soucie pas des pixels en dessous. La ligne peut être droite ou incurvée, mais elle va toujours d'un point à un autre, et comme je l'ai mentionné, cela n'a rien à voir avec les pixels de l'image. Un chemin est complètement séparé de l'image elle-même. En fait, un chemin est si séparé que si vous essayez d'imprimer votre image avec un chemin visible sur votre écran, le chemin n'apparaîtra pas sur le papier. De plus, si vous avez enregistré votre image en tant que fichier JPEG.webp et l'avez téléchargée sur un site Web, même si vous avez enregistré l'image avec le chemin visible sur votre écran dans Photoshop, vous ne la verrez pas dans l'image sur le site Web. Les chemins sont réservés à vos yeux et à Photoshop uniquement. Personne ne les verra jamais, à moins qu'ils ne passent devant votre ordinateur pendant que vous travaillez.
Nous avons toujours besoin d'un minimum de deux points pour créer un chemin, car nous devons savoir où le chemin commence et où il se termine. Si nous utilisons suffisamment de points pour ramener notre chemin au même point de départ, nous pouvons créer différentes formes à partir des chemins, ce qui est exactement le fonctionnement des différents outils de forme de Photoshop. L'outil Rectangle utilise des chemins, reliés par des points, pour dessiner une forme rectangulaire. L'outil Ellipse utilise des chemins, reliés par des points, pour dessiner une forme elliptique, etc. C'est aussi la façon dont l'outil de saisie de Photoshop fonctionne, bien que Photoshop gère le type un peu différemment de celui qu'il gère les formes régulières, mais tout type dans Photoshop est essentiellement fait à partir de chemins. En fait, vous pouvez convertir le type en formes, ce qui vous donne ensuite toutes les mêmes options d'édition de chemin avec le type que vous obtenez lorsque vous travaillez avec des formes.
Vous avez peut-être également entendu des chemins appelés contours, et c'est une assez bonne description de ce qu'est un chemin, ou du moins, ce qu'un chemin peut être. Nous pouvons dessiner un chemin carré, et si nous ne faisons rien d'autre avec lui, comme dans nous ne le remplissons pas avec une couleur ou ne lui appliquons pas de trait, alors tout ce que nous avons est un contour de base d'un carré. Idem avec un cercle ou toute autre forme que nous dessinons. Le chemin lui-même n'est que le contour de la forme. Ce n'est que lorsque nous faisons quelque chose avec le chemin, comme le remplir, appliquer un trait ou le convertir en sélection, que le chemin devient en fait quelque chose de plus qu'un contour de base.
Vous pouvez sélectionner un chemin entier à l'aide de l'outil de sélection de chemin (également appelé outil "flèche noire"), ou vous pouvez sélectionner des points individuels ou des segments de chemin à l'aide de l'outil de sélection directe (l'outil "flèche blanche"). Un «segment» ou «segment de ligne» de chemin, comme on l'appelle parfois, est un chemin entre deux points. Un chemin rectangulaire, par exemple, serait composé de quatre points (un dans chaque coin), et les chemins individuels reliant les points ensemble en haut, en bas, à gauche et à droite pour créer la forme du rectangle sont les segments de chemin . Le chemin réel lui-même est la combinaison de tous les segments de chemin individuels qui composent la forme.
Cela peut être un peu déroutant, alors voyons ce que je veux dire. Ouvrez un nouveau document dans Photoshop. Peu importe sa taille. Je choisirai la taille 640x480 dans la liste des préréglages, mais comme je l'ai dit, peu importe la taille que vous choisissez. Sélectionnez votre stylo dans la palette d'outils. Vous pouvez également sélectionner l'outil Plume en appuyant simplement sur la lettre P de votre clavier.
Les deux modes de l'outil Plume
Maintenant, avant de continuer, nous devons d'abord nous assurer que nous travaillons avec des chemins, et c'est parce que l'outil Plume a en fait deux modes différents dans lesquels il peut fonctionner, et par défaut, il utilise l'autre. Avec l'outil Plume sélectionné, si nous recherchons dans la barre des options en haut de l'écran, nous verrons un groupe de trois icônes:

La barre d'options dans Photoshop montrant le groupe de trois icônes représentant chacun des trois modes de l'outil Plume.
Je sais que j'ai dit qu'il y a deux modes dans lesquels l'outil Pen peut fonctionner et pourtant, comme pour rendre les choses plus confuses, il y a trois icônes, mais l'icône à droite, qui est l'icône Remplir les pixels, est grisée et n'est pas disponible lorsque vous travaillez avec l'outil Pen. Il n'est disponible que lorsque vous travaillez avec les différents outils de forme, il n'y a donc vraiment que deux icônes que nous devons examiner.
L'icône à gauche est l'icône des calques de forme, également connue sous le nom de "pas celle que nous voulons", et c'est celle qui est sélectionnée par défaut. Si nous devions travailler avec l'outil Plume avec cette icône sélectionnée, nous dessinerions des formes, comme si nous utilisions l'un des divers outils de forme, sauf qu'au lieu de dessiner une forme prédéfinie comme un rectangle ou une ellipse, nous pourrait dessiner n'importe quelle forme que nous voulions. Comme je l'ai dit cependant, ce n'est pas ce que nous voulons. Nous voulons l'icône à côté d'elle, l'icône Chemins, alors allez-y et cliquez dessus pour la sélectionner:

Tutoriels Photoshop: cliquez sur l'icône "Chemins" dans la barre des options pour travailler avec des chemins avec l'outil Plume.
Avec l'outil Plume sélectionné et l'icône Chemins sélectionnés dans la barre des options, cliquez une fois n'importe où dans votre document. Ne cliquez pas et ne faites pas glisser, cliquez simplement. Lorsque vous le ferez, vous ajouterez un petit point carré. Je l'ai agrandi ici:

Cliquez une fois à l'intérieur du document avec l'outil Plume pour ajouter un point.
Ce premier point que nous venons d'ajouter est le point de départ de notre chemin. Pour le moment, nous n'avons pas vraiment de chemin. Tout ce que nous avons, c'est un point de départ. Le "point" est techniquement appelé une ancre ou un point d'ancrage, et il est nommé ainsi car il ancre le chemin en place. Ce premier point ancrera le début du chemin à cet endroit à l'intérieur du document. Au fur et à mesure que nous ajoutons des points, chacun d'entre eux ancrera le chemin en place à cet endroit.
Ajoutons un autre point. Cliquez ailleurs dans le document. N'importe où fera l'affaire. Je vais cliquer quelque part à droite de mon point initial:

Tutoriels Photoshop: ajoutez un deuxième point d'ancrage en cliquant ailleurs dans le document.
J'ai maintenant ajouté un deuxième point d'ancrage et regardez ce qui s'est passé. J'ai maintenant une ligne droite joignant les deux points ensemble! Cette ligne droite est mon chemin. Comme je l'ai mentionné plus tôt, nous avons besoin d'un minimum de deux points pour créer un chemin, car nous devons savoir où le chemin commence et où il se termine, et maintenant que nous avons à la fois un point de départ et un point d'arrivée, Photoshop a pu connecter le deux points ensemble, créant notre chemin.
Ajoutons quelques points supplémentaires juste pour le plaisir. Cliquez à plusieurs reprises à différents endroits du document. Encore une fois, ne cliquez pas et ne faites pas glisser, cliquez simplement sur:
Ajoutez des points supplémentaires en cliquant à différents endroits du document.
Dans l'image ci-dessus, j'ai ajouté sept points d'ancrage supplémentaires en cliquant à différents endroits avec l'outil Plume, et chaque fois que j'en ai ajouté un, la longueur de mon chemin a augmenté car un nouveau "segment" de chemin a été ajouté entre le point précédent et le nouveau point. Mon chemin se compose désormais de neuf points d'ancrage et de huit segments de chemin. Je pourrais continuer à cliquer à l'intérieur du document pour ajouter plus de points d'ancrage et de segments de chemin, mais ce que j'aimerais vraiment faire maintenant, c'est fermer mon chemin afin qu'il forme une forme complète.
Fermer un chemin
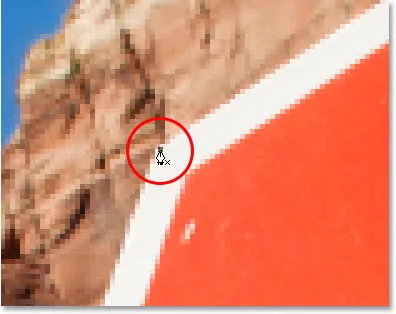
Pour fermer un chemin, il suffit de cliquer à nouveau sur notre point de départ initial. Lorsque vous placez le curseur de votre souris sur le point de départ, un petit cercle apparaît dans le coin inférieur droit de l'icône du stylet:

Un petit cercle apparaît dans le coin inférieur droit de l'icône du stylet lorsque vous passez le curseur sur le point de départ initial du chemin.
Ce cercle nous indique que nous sommes sur le point de boucler la boucle avec notre chemin, le terminant là où il a commencé. Pour le fermer, cliquez simplement directement sur le point de départ.
Nous pouvons voir ci-dessous que mon chemin est devenu un chemin fermé et est maintenant un contour de base d'une forme:
Le chemin est maintenant fermé, se terminant au point de départ, créant un chemin fermé.
Même si ce chemin a été dessiné juste pour le plaisir comme exemple de la façon de dessiner un chemin de base avec l'outil Plume, je peux facilement transformer ce chemin en sélection. Pour cela, nous avons besoin de la palette Paths de Photoshop, et nous verrons cela ensuite.
Transformer un chemin en sélection
Jusqu'à présent, nous avons examiné ce qu'est un chemin et comment dessiner un chemin de base avec l'outil Pen de Photoshop. Mais comment allez-vous faire une sélection à partir du chemin?
Facile! Il y a deux façons de transformer un chemin en sélection, y compris un raccourci clavier pratique, mais avant de regarder la manière rapide, regardons la manière officielle. La "manière officielle" implique l'utilisation de la palette Chemins de Photoshop, que vous trouverez regroupée avec la palette Calques et la palette Canaux:
Palette de trajectoires de Photoshop.
À première vue, la palette Chemins ressemble beaucoup à la palette Calques de Photoshop, et Adobe l'a délibérément conçue comme ça pour que vous vous sentiez plus à l'aise de l'utiliser. Nous pouvons voir un aperçu miniature de la forme du chemin que nous venons de créer, et par défaut, Photoshop nomme le chemin "Work Path", qui est fondamentalement une façon élégante de dire "temporaire", comme si vous deviez créer un autre chemin maintenant sans renommer ce chemin en autre chose d'abord, celui-ci serait remplacé par le nouveau chemin. Vous ne pouvez avoir qu'un seul "Work Path", donc si vous voulez le conserver, vous devrez double-cliquer sur son nom dans la palette Paths et le nommer autre chose avant de créer un nouveau chemin.
Puisque mon chemin ressemble un peu à une couronne, je vais double-cliquer sur le nom "Work Path", avec la boîte de dialogue Save Path de Photoshop, et je vais renommer mon chemin "Crown":

Vous pouvez enregistrer un "Work Path" temporaire simplement en le renommant.
Je clique sur OK lorsque j'ai terminé, et maintenant si je regarde à nouveau dans ma palette Chemins, je peux voir que bien sûr, mon "Chemin de travail" a été renommé "Couronne":
La palette Chemins indiquant que le chemin a été renommé "Couronne".
En le renommant, le chemin est maintenant enregistré et ne disparaîtra pas si je crée un nouveau chemin. De plus, tous les chemins enregistrés sont enregistrés avec le document Photoshop, donc maintenant, si j'enregistre mon document, le chemin sera enregistré avec lui et la prochaine fois que j'ouvrirai le document, le chemin sera toujours là dans la palette Chemins.
L'enregistrement d'un chemin n'est pas quelque chose que vous devez faire pour le transformer en sélection. Dans la plupart des cas, lorsque vous utilisez l'outil Plume pour effectuer des sélections, vous n'aurez plus besoin du chemin une fois que vous en aurez fait une sélection, il ne sera donc pas nécessaire de l'enregistrer. Si vous souhaitez l'enregistrer, renommez-le simplement en quelque chose d'autre que "Work Path" et il est enregistré.
Pour transformer le chemin en sélection, si nous regardons le bas de la palette Chemins, nous pouvons voir plusieurs icônes. Ces icônes nous permettent de faire différentes choses avec notre chemin. La première icône à gauche est l'icône Remplir le chemin avec la couleur de premier plan, et comme son nom l'indique, cliquer dessus remplira notre chemin avec notre couleur de premier plan actuelle. Intéressant, mais ce n'est pas ce que nous voulons. La deuxième icône à partir de la gauche est l'icône Trajectoire du tracé avec pinceau, qui appliquera un tracé à notre tracé à l'aide du pinceau que nous avons actuellement sélectionné.
C'est un excellent moyen de créer des effets intéressants dans Photoshop, mais pour ce que nous faisons ici, transformer un chemin en sélection, ce n'est pas ce que nous voulons non plus. Celui que nous voulons est la troisième icône à partir de la gauche, le chemin de chargement comme icône de sélection:
L'icône "Charger le chemin en tant que sélection" en bas de la palette Chemins.
Dès que je clique sur cette icône, mon chemin dans mon document devient une sélection, comme si je l'avais créé à l'aide de l'un des outils de sélection les plus courants de Photoshop:
Le chemin a maintenant été converti en sélection.
C'est si facile! En fait, c'est encore plus facile que cela, car il existe un raccourci clavier pour transformer un chemin en sélection sans avoir à basculer du tout vers la palette Chemins. Lorsque vous avez tracé votre chemin et que vous êtes prêt à le transformer en sélection, appuyez simplement sur Ctrl + Entrée (Win) / Commande + Retour (Mac) pour que Photoshop convertisse le chemin en sélection.
À présent, il peut être un peu plus évident pour vous pourquoi, même si l'outil Plume est un outil de sélection, il n'est pas groupé avec les autres outils de sélection en haut de la palette d'outils. La raison en est que l'outil Plume est principalement un outil de tracé. Il crée des sélections en créant d'abord des chemins, et pour cette raison, il a plus en commun avec les divers outils de forme et l'outil de type, qui utilisent tous des chemins, qu'avec les outils de sélection de base comme l'outil de sélection rectangulaire ou le lasso Outil, qui effectue des sélections basées uniquement sur les pixels.
Regardons un exemple pratique de ce que nous avons appris jusqu'à présent. Ici, nous avons une photo d'un panneau d'arrêt devant des falaises rocheuses:

Une photo d'un panneau d'arrêt.
Disons que je voulais sélectionner ce panneau d'arrêt pour pouvoir le copier sur son propre calque. Le panneau d'arrêt n'est composé que d'une série de lignes droites, ce qui rendra cela extrêmement facile. Tout d'abord, j'ai besoin d'un point de départ pour mon chemin, je vais donc commencer dans le coin supérieur gauche du panneau en cliquant une fois pour placer un point d'ancrage initial. Dans ce cas, peu importe où je commence le chemin, mais je vais commencer dans le coin supérieur gauche:
Cliquez une fois dans le coin supérieur gauche du panneau d'arrêt pour commencer le chemin avec un point d'ancrage initial.
Remarquez comment je fais un zoom avant ici en cliquant. Vous trouverez plus facile lorsque vous effectuez des sélections avec l'outil Plume de zoomer un peu sur votre image. De cette façon, vous pouvez être sûr de garder votre chemin juste à l'intérieur de la zone que vous souhaitez sélectionner.
Pour l'instant, je n'ai pas de chemin, j'ai juste un point de départ pour mon chemin. Pour créer le chemin, tout ce que je dois faire est de contourner le signe en ajoutant un point d'ancrage dans chaque coin où le chemin doit changer de direction. Au fur et à mesure que j'ajoute chaque point d'ancrage, un nouveau segment de chemin apparaîtra, joignant le point d'ancrage précédent au nouveau, jusqu'à ce que je fasse le tour du panneau. Pour fermer le chemin, je clique simplement sur le point de départ initial. C'est un peu difficile à voir dans la capture d'écran ci-dessous, mais j'ai maintenant un chemin autour de tout le panneau d'arrêt, y compris le poteau auquel il est attaché, en cliquant simplement dans les coins où le chemin doit changer de direction:

Un chemin apparaît maintenant tout autour du panneau d'arrêt dans l'image.
Si je regarde dans ma palette Chemins maintenant, je peux voir très clairement que j'ai un chemin en forme de panneau d'arrêt:
La palette Chemins de Photoshop montrant le chemin tracé autour du panneau d'arrêt.
Remarquez comment Photoshop a nommé le chemin "Chemin de travail", ce qui signifie que ce chemin est temporaire et je le perdrai si je crée un chemin différent sans d'abord enregistrer celui-ci en le renommant. Même si je ne crée pas de nouveau chemin, je le perdrai quand je fermerai le document, sauf si je le sauvegarde d'abord. Je n'ai cependant pas besoin d'enregistrer ce chemin, donc je ne m'en inquiéterai pas. Dans la plupart des cas, vous n'aurez pas à vous en préoccuper non plus.
Pour convertir mon chemin d'accès en sélection, je clique sur le chemin d'accès en tant qu'icône de sélection en bas de la palette des calques, ou je peux tout aussi facilement appuyer sur Ctrl + Entrée (Win) / Commande + Retour (Mac):
Cliquez sur l'icône "Charger le chemin en tant que sélection" dans la palette Chemins, ou appuyez sur "Ctrl + Entrée" (Win) / "Commande + Supprimer" (Mac) pour convertir le chemin en sélection.
Dès que je le fais, mon chemin est converti en sélection, et le panneau d'arrêt est maintenant sélectionné:

Le panneau d'arrêt est maintenant sélectionné après avoir converti le chemin en sélection.
Je reviens à ma palette Calques et pour copier le panneau d'arrêt sur son propre calque, j'utiliserai le raccourci clavier Ctrl + J (Win) / Commande + J (Mac), qui place le signe seul calque au-dessus du calque d'arrière-plan:
Le panneau d'arrêt a maintenant été copié sur son propre calque séparé.
Avec le signe maintenant sur son propre calque, je peux faire tout ce que j'aime avec, échanger l'arrière-plan avec une image différente, ou rendre l'arrière-plan noir et blanc tout en laissant le signe en couleur, tout ce que je peux penser. Le fait est que j'ai pu facilement sélectionner le signe en cliquant dans les coins avec l'outil Plume, qui a créé un chemin autour du signe, puis j'ai simplement converti le chemin en sélection.
Jusqu'à présent, dans notre étude de la sélection avec l'outil Plume dans Photoshop, nous avons appris que le stylet est tout simplement un outil de sélection comme les outils de sélection les plus courants de Photoshop comme le rectangle de sélection et les outils Lasso, mais qu'au lieu de faire des sélections basées sur sur les pixels comme le font ces autres outils, l'outil Plume trace des chemins qui peuvent ensuite être facilement convertis en sélections, soit à partir de la palette Chemins, soit en utilisant le raccourci clavier rapide.
C'est pourquoi le stylo ne se trouve pas en haut de la palette d'outils avec ces autres outils de sélection basés sur les pixels, mais est plutôt regroupé avec les outils de chemin, comme les divers outils de forme, l'outil de texte et les outils de sélection de chemin et de sélection directe. . L'outil Plume concerne les chemins, pas les pixels.
Nous avons appris que nous pouvons ajouter des points d'ancrage à l'intérieur de notre document, qui ancrent le chemin en place, en cliquant simplement à différents endroits avec l'outil Plume, et que nous ajoutons de plus en plus de points d'ancrage, nous créons un chemin comme chaque nouveau point est connecté au point précédent par un nouveau segment de chemin. Nous avons également appris qu'un chemin est ce que l'on appelle généralement un «élément non imprimable», ce qui signifie que peu importe le nombre de chemins que nous ajoutons, aucun d'entre eux ne sera visible sur le papier lorsque nous irons imprimer l'image. . Ils ne seront également pas visibles si nous affichons l'image sur un site Web. Les chemins ne sont visibles que par nous lorsque nous travaillons dans Photoshop (bien que d'autres programmes comme Adobe Illustrator prennent également en charge les chemins). Ce n'est que lorsque nous faisons quelque chose avec le chemin, comme le remplir d'une couleur, lui appliquer un trait ou le convertir en sélection, que le chemin devient quelque chose de plus qu'un simple contour de base non imprimable d'une forme.
Nous avons vu combien il serait facile d'utiliser l'outil Plume pour sélectionner quelque chose comme un panneau d'arrêt en le décrivant avec un chemin composé d'une série de segments de chemin droits, puis en transformant le chemin en sélection. C'est génial, mais vraiment, nous n'avons encore rien fait que nous n'aurions pas pu faire plus facilement avec quelque chose comme l'outil Lasso, ou mieux encore, l'outil polygonal Lasso qui a été conçu spécifiquement pour sélectionner des formes à côtés plats comme notre arrêt signe. Les chances sont, à moins que vous n'ayez une étrange fascination pour les panneaux de signalisation, tôt ou tard, vous voudrez sélectionner quelque chose d'un peu plus intéressant, et par "intéressant", je veux dire plus difficile. Et par «difficile», je veux dire quelque chose qui contient des courbes. La sélection d'un objet incurvé dans Photoshop se produit généralement lorsque vous vous retrouvez en train de perdre tout respect pour les outils de sélection de base. Heureusement, c'est aussi le moment où le Pen Tool brille vraiment!
Avant de continuer, je dois souligner que tout ce que nous avons fait jusqu'à présent a été assez simple. Cliquez ici, cliquez ici, convertissez le chemin en une sélection, c'est fait. Cette partie suivante où nous entrons dans le dessin de courbes n'est pas aussi simple, bien que ce ne soit certainement pas difficile, mais si c'est votre première fois avec l'outil Plume ou si vous n'avez pas beaucoup d'expérience avec lui, travailler avec des courbes peut sembler un peu naturel et même un peu écrasant. C'est certainement là que l'analogie «rouler à vélo» entre en jeu. Vous pouvez tomber plusieurs fois au début et vous demander comment quelqu'un réussit à le faire, mais plus vous pratiquez et plus vous vous en tenez à cela, plus tout est sensé commence à faire. En un rien de temps, cela vous semblera une seconde nature et vous comprendrez soudainement pourquoi tant de gens jurent que l'outil Pen est le meilleur outil de sélection dans Photoshop! Sérieusement, ça l'est vraiment.
Prise en main des poignées de direction
Commençons à nouveau avec l'outil Pen. Ouvrez un nouveau document Photoshop vierge ou supprimez simplement ce que vous avez fait jusqu'à présent dans le document existant afin que nous commencions à nouveau. Ensuite, avec l'outil Plume sélectionné et l'option Chemins sélectionnés dans la barre des options (rappelez-vous, il s'agit par défaut de l'option Calques de forme, vous devrez donc vous assurer que l'option Chemins est sélectionnée), cliquez une fois n'importe où dans votre document, tout comme nous l'avons fait avant. Cette fois cependant, plutôt que de simplement cliquer pour ajouter un point d'ancrage, cliquez et faites glisser votre souris à une courte distance du point d'ancrage avant de relâcher le bouton de votre souris:
Cliquez n'importe où à l'intérieur du document avec l'outil Plume, puis faites-le glisser à une courte distance du point d'ancrage.
Lorsque vous avez terminé, vous verrez un point d'ancrage avec deux lignes s'étendant à partir de celui-ci. À première vue, vous pensez peut-être que nous avons en quelque sorte réussi à faire glisser un chemin avec l'outil Plume. Après tout, il semble que nous ayons trois points d'ancrage, un à chaque extrémité et un au milieu, avec deux segments de chemin les reliant. Si nous regardons un peu plus près, nous pouvons voir que les points à chaque extrémité sont un peu plus petits que ceux du milieu et qu'ils sont en fait une forme différente. Celui du milieu est carré, et comme nous l'avons vu, un point d'ancrage est carré, mais ceux à chaque extrémité semblent être en forme de losange. Certains points d'ancrage sont-ils carrés et certains en forme de losange?
Nan. Tous les points d'ancrage sont carrés et ils sont tous de la même taille, ce qui signifie que ces petits points en forme de losange aux extrémités ne sont pas des points d'ancrage. Et si ce ne sont pas des points d'ancrage, cela signifie que les lignes ne sont pas des segments de chemin, car nous avons besoin d'au moins deux points d'ancrage pour créer un chemin et actuellement le seul point d'ancrage que nous avons est celui du milieu. Alors, quelles sont exactement ces lignes qui s'étendent à partir du point d'ancrage? Ce sont des poignées de direction!
"Ah, les poignées de direction!" vous dites. "Maintenant je comprends!"
… … …………….
"Attends, non je ne sais pas. Qu'est-ce que c'est que ces poignées de direction?"
Les poignées de direction sont, bien, des poignées, et elles ne sont utilisées que lors de la création de segments de chemin incurvés. Il n'y a pas besoin de poignées de direction lors de la création de segments de trajectoire droits. Il y en a généralement deux, bien que parfois il n'y en ait qu'un, et comme nous l'avons déjà vu, ils s'étendent à partir de points d'ancrage. Ils sont appelés "poignées" car, comme nous le verrons dans un instant, vous pouvez en fait les saisir et les déplacer.
Les poignées de direction contrôlent deux choses. Ils contrôlent l'angle de la courbe, et ils contrôlent la longueur de la courbe, et ils le font d'une manière vraiment soignée. La raison pour laquelle il y en a généralement deux est parce que l'un d'eux contrôle l'angle et la longueur de la courbe entrant dans le point d'ancrage, et l'autre contrôle l'angle et la longueur de la courbe sortant du point d'ancrage.
Avant de voir comment dessiner des courbes avec les poignées de direction, voyons d'abord comment contrôler les poignées elles-mêmes, car notre succès avec le dessin de courbes dépendra beaucoup de notre capacité à contrôler les poignées. Ne vous inquiétez pas, ce n'est pas, comme on dit, la science des fusées. Il y a juste quelques choses simples que vous devez apprendre. Nous avons déjà vu comment créer des poignées de direction, en cliquant avec l'outil Plume, puis en les éloignant du point d'ancrage. Plus nous nous éloignons du point d'ancrage, plus les poignées de direction seront longues. Plus la poignée est longue, plus la courbe est longue. Poignée courte, courbe courte. Long manche, longue courbe.
L'une des bonnes choses que vous apprendrez assez rapidement sur l'outil Pen est qu'il est extrêmement indulgent. Il n'y a aucune raison de s'inquiéter de bien faire les choses la première fois lorsque vous tracez des chemins avec, car nous pouvons revenir en arrière et réparer les choses facilement lorsque nous avons terminé! Avez-vous placé un point d'ancrage au mauvais endroit? Aucun problème! Déplacez-le là où vous en avez besoin! Nous verrons comment faire cela dans un instant. Avez-vous fait glisser une poignée de direction dans la mauvaise direction? Pas de problème. Saisissez la poignée et faites-la pivoter dans la direction dont vous avez besoin. Encore une fois, nous verrons comment procéder. L'une de vos poignées de direction est-elle trop longue ou trop courte? Aucun problème du tout. Cliquez simplement dessus, puis faites-le glisser plus ou moins longtemps si nécessaire (oui, nous allons voir comment faire cela aussi). Les chemins sont entièrement modifiables à tout moment, il n'y a donc absolument aucune raison de s'inquiéter de faire une erreur ou de la corriger la première fois. Cela ne vous fait-il pas déjà sentir un peu mieux?
Poignées de rotation et de redimensionnement
Comme je l'ai mentionné, ils sont appelés "poignées" de direction, car vous pouvez les saisir comme des poignées et les déplacer. Voyons comment faire ça. Tout d'abord, nous verrons comment faire pivoter les deux poignées en même temps. À l'aide du point d'ancrage et des deux poignées de direction que nous avons déjà créées, maintenez enfoncée la touche Ctrl (Win) / Commande (Mac). Vous verrez votre icône Pen Tool se transformer temporairement en icône de l'outil de sélection directe (la flèche blanche), et c'est parce qu'avec l'outil Pen sélectionné, maintenir "Ctrl / Commande" devient un raccourci rapide pour accéder temporairement à l'outil de sélection directe qui est ce que nous utilisons pour sélectionner différentes parties de notre chemin. Ensuite, cliquez simplement directement sur la petite forme de diamant à la fin de l'une des poignées de direction (cliquer sur la "ligne" elle-même ne fonctionnera pas, vous devez donc toujours cliquer sur la forme de diamant à la fin d'une poignée pour faire quoi que ce soit avec lui) et faites-le glisser autour du point d'ancrage pour le faire pivoter. Lorsque vous tournez l'une des poignées, l'autre poignée tourne avec elle dans le sens opposé, un peu comme une balançoire. Vous pouvez également remarquer que dès que vous commencez à faire glisser la poignée, l'icône du curseur de votre souris se transforme à nouveau, cette fois en icône Déplacer l'outil, car nous déplaçons quelque chose d'un endroit à un autre:
Maintenez "Ctrl" (Win) / "Commande" (Mac) et cliquez sur l'extrémité de l'une des poignées de direction, puis faites glisser la poignée pour la faire pivoter autour du point d'ancrage. Lorsque vous faites glisser une poignée, l'autre tourne dans le sens opposé.
Vous pouvez relâcher votre touche "Ctrl / Commande" une fois que vous avez commencé à faire glisser la poignée. Pas besoin de le garder tout le temps.
Pour redimensionner une poignée de direction lorsque vous la faites pivoter, faites simplement glisser l'extrémité de la poignée vers le point d'ancrage pour la raccourcir ou éloignez-la du point d'ancrage pour la rallonger. Comme je l'ai mentionné ci-dessus, une poignée plus courte raccourcira la courbe et une poignée plus longue allongera la courbe. Cependant, vous ne pouvez pas redimensionner les deux poignées en même temps, donc si vous devez les redimensionner toutes les deux, vous devrez les faire glisser chacune plus ou moins longtemps séparément. La seule chose que vous pouvez faire pour les deux en même temps est de les faire pivoter. Si vous avez déjà relâché le bouton de votre souris après avoir fait pivoter les poignées et que le curseur est redevenu l’icône de l’outil Plume et que vous devez redimensionner l’une des poignées, vous devrez de nouveau maintenir enfoncée la touche «Ctrl / Commande» pour temporairement revenez à l'outil de sélection directe, puis cliquez et faites glisser l'extrémité de la poignée pour la redimensionner:
Faites glisser les extrémités des poignées vers le point d'ancrage pour les raccourcir ou éloignez-les du point d'ancrage pour les allonger.
Voyons maintenant comment faire pivoter les poignées indépendamment les unes des autres. To rotate one handle without affecting the other one, first release your mouse button if you've been rotating or resizing the handles so your cursor changes back into the Pen Tool icon. Then, instead of holding down "Ctrl/Command", which moves both handles at once, hold down your Alt (Win) / Option (Mac) key and click on the end of either of the direction handles. You'll see your cursor change into the Convert Point Tool icon, which looks like a simplified arrow made of only two lines, almost like an upside down letter "v" (except that it's not quite upside down). Then, simply drag the handle around the anchor point to rotate it, just as you did before, and this time, the handle will rotate independently of the other one, breaking the connection between them:
Hold down "Alt" (Win) / "Option" (Mac) and click on the end of either of the direction handles, then drag the handle to rotate it around the anchor point independently of the other handle.
Again, you can release your "Alt/Option" key after you've started dragging. You don't have to hold it down the whole time.
You can also resize direction handles using the "Alt/Option" key in exactly the same way as you can with the "Ctrl/Command" key. If you're in the process of rotating a handle, simply drag it in towards the anchor point to make it shorter or away from the anchor point to make it longer. If you've already released your mouse button and your cursor is showing the Pen Tool icon again, you'll need to hold down "Alt/Option" once again, then click on the end of the handle and drag it to resize it.
Is there a difference between resizing the handles using "Ctrl/Command" and using "Alt/Option" to do it? Yes there is. If you haven't yet "broken the connection" between the handles by dragging one independently of the other, resizing a handle using "Ctrl/Command" will keep the handles connected together. It won't resize both handles at once, but it won't break the connection between them either so you'll still be able to rotate them together if you need to. If you resize a handle using "Alt/Option", you'll break the connection between the handles. Even if you don't rotate the handle as you're resizing it, the connection will still be broken.
What if you've broken the connection between the handles by rotating them using "Alt/Option" and then want to rotate them together again? Can you "rebuild the connection", so-to-speak, by selecting one of them while holding down "Ctrl/Command" as before? Good question, and the answer is no. Once you've broken the connection between the handles, the "Ctrl/Command" key on its own won't bring it back. You'll need to select one of the handles while holding Ctrl+Alt (Win) / Command+Option (Mac) at that point in order to move the handles together again.
Quick Summary So Far …
We've covered a lot of information here about working with direction handles, so before we move on and start drawing some actual curves, let's do a quick recap:
- To add an anchor point, simply click with the Pen Tool.
- To add an anchor point with direction handles extending out from it, click with the Pen Tool, then drag away from the anchor point before releasing your mouse button. The further you drag, the longer the direction handles will be.
- To rotate the direction handles together, hold down Ctrl (Win) / Command (Mac), which will temporarily switch you to the Direct Selection Tool, then click on the end of either handle and drag it around the anchor point. The other handle will rotate in the opposite direction.
- To rotate the direction handles independently, hold down Alt (Win) / Option (Mac), which will temporarily switch you to the Convert Point Tool, then click on the end of either handle and drag it around the anchor point. The other handle will not rotate.
- To resize handles without breaking the connection between them, hold down Ctrl (Win) / Command (Mac) to switch to the Direct Selection Tool, then click on the end of either handle. Drag it towards the anchor point to make it shorter, or drag it away from the anchor point to make it longer.
- To resize handles and break the connection between them, hold down Alt (Win) / Option (Mac) to switch to the Convert Point Tool, then click on the end of either handle. Drag it towards the anchor point to make it shorter, or drag it away from the anchor point to make it longer.
- To rotate the direction handles together after breaking the connection, hold down Ctrl+Alt (Win) / Command+Option (Mac), then click on the end of either handle and drag it around the anchor point. The other handle will once again rotate with it.
Okay, that pretty much covers the basics of how to control the direction handles. Let's see how we can use them to draw some curves!
We've covered a lot of ground so far. We know about anchor points and direction handles. We know that in order to draw straight path segments, all we need to do is lay down a series of anchor points wherever we need them simply by clicking with the Pen Tool, and as we add more and more anchor points, we add more straight sections to our path. We know how to create direction handles and how to rotate them, either together or separately, and how to resize them.
We know how to turn a path into a selection by clicking on the "Load path as selection" icon at the bottom of the Paths palette or by simply pressing "Ctrl+Enter" (Win) / "Command+Return" (Mac) on the keyboard. One thing I didn't mention yet is that regardless of whether our path consists of straight lines,
curves, or a combination of straight lines and curves, converting it into a selection is done exactly the same way, and we've already learned how to do it, which means we're well on our way to mastering making selections with the pen! All we need to do is get a bit of practice drawing curves, which is exactly what we're about to do!
Toujours en défilement? Téléchargez ce tutoriel au format PDF!
Drawing A Curve
Let's once again start fresh, either by opening up a new blank document in Photoshop or by deleting what you've already done. We're going to draw our first curve so we can put all of our newly-aquired direction handle knowledge to use. First, with the Pen Tool selected and the Paths option selected in the Options Bar, click once somewhere in your document to add an anchor point. Just click, don't click and drag. You should have one single anchor point on the screen when you're done.
Then, move your mouse cursor up and to the right of your initial anchor point. Click again to add a second anchor point, but this time, drag your mouse a little to the right of the anchor point to drag out direction handles. Hold down Shift as you drag to constrain your movement to a horizontal direction. As you drag out the direction handles, you'll see your path appearing as a curve between the two anchor points! The further you drag your mouse, the longer you make the direction handles, and the more of a curve you create:
Click once to add an anchor point, then click and drag out a second anchor point with direction handles, creating a curved path segment between the two points.
Click down and to the right of the second anchor point to add a third anchor point. This time, don't click and drag, just click:
Add a third anchor point down and to the right of the second one by clicking with the Pen Tool.
As soon as you add the third anchor point, a second path segment will appear, joining the second anchor point with the third one. And because our second anchor point has direction handles extending from it, this new path segment is also curved! We now have a nice, smooth arc starting from the first point on the left, then passing through the anchor point with the direction handles up top, and coming to an end at the third point.
One thing you may have noticed, and you can see it in the screenshot above, is that when you added the third anchor point, the direction handle extending out the left side of the second anchor point disappeared. It's still there, Photoshop simply hid it from view. To see it again, use the keyboard shortcut we've already learned to temporarily switch to the Direct Selection Tool, which is by holding down the Ctrl (Win) / Command (Mac) key, and then click on the second anchor point to select it. As soon as you do, the missing direction handle reappears as if it was there the whole time (which it was):

Hold down the "Ctrl" (Win) / "Command" (Mac) key to temporarily switch to the Direct Selection Tool, then click on the top anchor point to select it. The missing anchor point reappears.
With your "Ctrl/Command" key still held down so you still have access to the Direct Selection Tool, try resizing each direction handle by clicking on the end of each one to select it and then dragging it towards and away from its anchor point. Again, hold "Shift" as you drag to constrain your movement horizontally, and watch what happens. As you increase the length of a handle, you get more of a curve, and as you decrease its length, you get less of a curve. Also notice that each handle controls its own side of the curve. The handle on the left controls the curve coming into the anchor point from the left, and the handle on the right controls the curve flowing out from the anchor point on the right.
Here, I've made my handle on the left shorter, and as we can see, there's much less of a curve now than there was originally, almost becoming a straight line. I've also made the handle on the right longer, and as a result, the curve on the right is now much more pronounced. The faint curve is the original for comparison:
Change the shape of the curves by resizing the direction handles. The left handle controls the left curve, and the right handle controls the right curve.
I'm going to undo my changes by pressing Ctrl+Alt+Z (Win) / Command+Option+Z (Mac) a couple of times to set my direction handles back to their original sizes so they're equal length once again. Now let's try rotating the handles. Hold down "Ctrl/Command" once again to access the Direct Selection Tool, then click on the end of either handle to select it and try rotating it around the anchor point. Since we selected the handle with "Ctrl/Command", both handles rotate together. Here I've dragged my left handle down and to the right, and the angle of the curve on the left changed along with it, now appearing as more of a slope as it rises up towards the anchor point. By dragging the left handle down and to the right, I caused the right handle to rotate up and to the left, and again, the angle of the curve on the right changed along with it, now rising above the anchor point briefly before making a steep decent down to the anchor point on the right. Again, the faint curve is the original for comparison:
Rotate the direction handles to change the angle of the curves. Select a handle while holding "Ctrl" (Win) / "Command" (Mac) to rotate both handles together.
The Dreaded "Loop"
One thing you want to avoid is rotating the handles too far, which will cause your path segments to overlap and create loops. Here, I've rotated my handles all the way around so that the left handle is now on the right and the right handle is on the left, and notice what's happened. My path segments are now overlapping each other, creating a loop:
Rotating the direction handles too far causes the path segments to overlap, creating an unwanted loop in the path.
Loops can be caused by rotating the direction handles too far, as I've done above, but more often than not, they're caused by a handle being too long, making the curve too long and causing it to overlap with itself. If that happens, which it does sometimes as you're drawing a path, simply shorten the length of the direction handle. Most people end up creating a whole bunch of loops in their path when they first start working with the Pen Tool, so don't think you're the only one. No need to panic or become frustrated though. As I said, the problem is most likely being caused by a direction handle being too long, and all you need to do is shorten the handle to "un loop" the loop!
I'm going to press Ctrl+Alt+Z (Win) / Command+Option+Z (Mac) a few times once again to undo my changes and reset my path back to the nice smooth arc I started with. Now, what about rotating the direction handles independently of each other? As we learned on the previous page, to rotate the handles separately, instead of selecting them with "Ctrl/Command", we simply select them while holding down Alt (Win) / Option (Mac), which gives us temporary access to the Convert Point Tool. Click on the end of a handle to select it, then drag it with your mouse to rotate it and this time, the other handle will stay in place, breaking the connection between them.
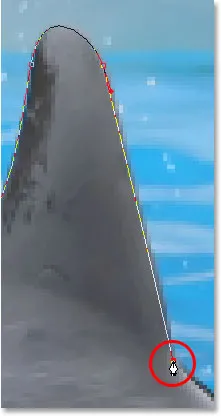
Here, I've selected the handle on the right while holding "Alt/Option" and then rotated it down and to the left. Notice how once again, the angle of the path segment on the right changes to match the new direction of the handle, and this time, the handle on the left, along with the path segment on the left, both stay in place. My path now looks a bit like a shark fin:
Hold down "Alt" (Win) / "Option" (Mac) to temporarily access the "Convert Point Tool", then click on the end of a direction handle to select it and rotate it independently of the other handle.
Moving An Anchor Point
One thing we haven't looked at yet is how to move an anchor point. If you recall, I mentioned on the previous page that the Pen Tool is extremely forgiving, and one of the reasons for it, besides being able to rotate and resize our direction handles after we've created them, is that we can easily move anchor points from one spot to another if we need to. As we've already learned, anchor points anchor a path into place. The anchor points themselves, however, are not anchored into place. You can move an anchor point anywhere, anytime, and any path segments that are connected to it will move and adjust right along with it.
To move an anchor point, hold down Ctrl (Win) / Command (Mac) to temporarily access the Direct Selection Tool as we've already been doing, then simply click on the anchor point to select it and drag it to its new location with your mouse. Any path segments connected to it will move with it to the new location. Here, I've dragged my middle anchor point down a bit from its original location (again, the faint path marks the original location for comparison). Notice how the path itself has changed shape to adjust to the new location of the anchor point:
Hold down "Ctrl" (Win) / "Command" (Mac) and click on an anchor point to select it, then drag it to a new location. Any path segments connected to the point will move with it, changing shape as needed.
Normally, when outlining an object with a path to select it using the Pen Tool, you won't need to move to an anchor point quite as far as what I've done above, but it's very common to go back around your path after you've created it and nudge a few anchor points here and there to fine-tune the path. Once you've selected an anchor point, you can nudge it up, down, left or right using the arrow keys on your keyboard.
Combining Straight Paths With Curves
What if I didn't want both of my path segments to be curves? What if what I needed was for the first path segment to be curved, but the second one needed to be straight? Voyons comment faire ça. I'm going to delete my existing path and start over again. First, I'll click to add an anchor point to start things off. Then, just as before, I'll click to add a second anchor point up and to the right of my initial point, and this time, I'll drag out direction handles, which will create a curved path connecting the two points, giving me exactly what I had way up at the start of this page:
Click once to add an anchor point, then click to add a second anchor point and drag out direction handles to create a curve.
I now have my initial curve, but I want my next path segment to be straight. If I was to simply click somewhere to add another anchor point right now, I would get another curve because I have that direction handle extending out from the right side of the last anchor point I added. What I need to do is get rid of that one direction handle. Without a direction handle controlling the angle and length of a curve, we get a straight line.
To remove the handle, leaving only the handle on the left of the anchor point, all I need to do is hold down Alt (Win) / Option (Mac), which will again temporarily switch me to the Convert Point Tool, and then I just click directly on the anchor point. When I do, the direction handle on the right disappears, leaving only the one on the left:
Hold down "Alt" (Win) / "Option" (Mac) and click directly on the anchor point to remove the direction handle on the right, leaving only the one on the left.
Now, with the direction handle gone, if I click to add a new anchor point, I get a straight path segment between the two points :
With the direction handle on the right now gone, clicking to add a new anchor point adds a straight path segment between the two points.
I now have a curved path segment on the left and a straight one on the right! What if I wanted the exact opposite? Suppose I needed to start with a straight path segment and then follow it with a curve? To do that, first I'll start by clicking to add an initial anchor point. Then, since I want a straight path segment, all I need to do is click somewhere else to add a second anchor point, and I automatically get a straight path connecting the two points:
Click with the Pen Tool to add an initial anchor point, then click again somewhere else to add a second anchor point and create a straight path segment between them.
I'm going to keep my mouse button held down after clicking to add my second anchor point because I want my next path segment to be curved, and we know that in order to create a curve, we need a direction handle. To add a handle extending out from the right of my anchor point, I'm going to hold down Alt (Win) / Option (Mac), and with my mouse button still down, I'm simply going to to drag to the right of the anchor point. As I do, a direction handle will drag out along with it:
Hold down "Alt" (Win) / "Option" (Mac) and drag out a direction handle on the right of the anchor point.
Notice that the direction handle extended only from the right of the anchor point, not from both sides, leaving my straight path segment on the left in place. And now that I have my direction handle on the right, all I need to do to create my curve is click to add a third point:
Click to add a third anchor point, which creates a curved path segment between the previous anchor point and the new one.
And there we go! I now have a straight path segment on the left, followed by a curved segment on the right. Of course, most paths you draw are going to consist of more than just three anchor points. Let's say I wanted to continue this path, moving in the same general direction towards the right, and I want my next path segment to be curved as well. Just as I did a moment ago, I would leave my mouse button held down after clicking to add my third point. I would hold down Alt (Win) / Option (Mac) and I would drag out another direction handle. So far, we've only been dragging handles out towards the right, but what you really want to do is drag your handles out in the general direction you want the curve to follow. I want to create a curve that goes up and to the right, so I'm going to drag out a small handle in that same general direction:
Drag out your direction handles in the general direction of the curve.
Pointe! A good practice to get into is to keep your direction handles small when first dragging them out, since you never really know how long or at what exact angle they need to be until the actual curve appears, and the curve doesn't appear until you've added both of its anchor points. Once you've added both points and the curve appears, you can easily go back and make any adjustments you need to the handles. You may even want to wait until you've drawn the entire path before worrying about adjusting the handles.
With my direction handle created, I'm going to click to add a fourth anchor point, and I'm going to drag out direction handles from it as well:
Adding a fourth anchor point along with direction handles extending from it.
I now have a third segment added to my path, this one being a curve. Notice that this curve actually has two direction handles controlling it, one extending from the right of my third anchor point and one extending from the left of my fourth point:

The third path segment now has two direction handles, one on either end, working together to control the curve.
The overall shape of this curve is now being controlled by the length and direction of both of these handles. Watch what happens to the curve when I move the handles. I'll drag the bottom handle down and to the right, and I'll drag the top handle up and to the left. I'll also drag both of these handles longer. The faint curve is the original for comparison:
Changing the direction and/or length of either handle changes the overall shape of the curve. After rotating and lengthening both handles, the curve now appears in an "S" shape.
The curve is now a bit "S" shaped, and that's because the bottom handle is controlling the angle and length of the curve as it flows out from the third anchor point, while the top handle is controlling the angle and length of the curve as it flows into the fourth point. Changing the length and/or direction of either handle will change the overall shape of the curve.
I'm going to press Ctrl+Alt+Z (Win) / Command+Option+Z (Mac) a couple of times to undo the changes I made, so the curve is once again in a simple arc shape as it was a moment ago, and I think I'll finish off this path with another straight segment, which means I'll need to remove that direction handle extending out from the right side of the fourth anchor point. We've already learned how to do that, by holding down Alt (Win) / Option (Mac) and clicking directly on the anchor point itself:
Hold down "Alt" (Win) / "Option" (Mac) and click directly on the anchor point to remove the direction handle on the right.
With the direction handle gone, all I need to do now to add a straight path segment is click to add another anchor point:
The direction handle on the right is now gone, so we can add a straight path segment simply by clicking to add another anchor point.
We could continue this path for as long as we wanted, adding more straight segments and curves, but I think we'll stop here because we've pretty much covered everything we need to know about drawing paths with the Pen Tool at this point. That was a lot of information to take in, especially if this is your first time learning about paths. As I mentioned at the beginning, you won't become a Pen Master simply by reading through this tutorial, just as you won't learn how to ride a bike, or drive a car, learn to swim, or play the piano simply by reading about it. But hopefully you have some sense at this point of how to draw paths with the Pen Tool, how to draw straight path segments, how to draw curves by dragging out direction handles, how to change the length and angle of the curve by rotating and resizing the handles, and how to combine straight and curved segments in a path.
To finish off our look at making selections with the Pen Tool, let's see a practical example of how to select an object with curves.
Here, we have a photo of a couple of dolphins leaping out of the water. Definitely a couple of very curvy creatures:

A photo of two dolphins jumping out of the water.
Let's say we want to select these dolphins so we can use them for a design or a collage, or whatever the case may be. If you were to try selecting them with the Lasso Tool, which is most likely what you would end up using if you didn't know how to use the Pen Tool, not only would you have a tough time, you'd have an even tougher time trying to convince yourself that you were happy with the results when you were done. The reason is because the Lasso Tool simply isn't capable of making curved selections very well. The biggest problem with it, besides being a pixel-based selection tool, is that it relies on you having a steady enough hand to move it smoothly around the curves. Even if you don't suffer from a caffeine addiction, you could drive yourself crazy trying to draw a perfectly smooth curve with your mouse, or even with a pen tablet, and when you've finally given up, you'll still be left with a selection full of rough, jagged edges that just scream "amateur!". No one likes to be called an amateur, especially when there's no need for it thanks to the Pen Tool!
Examine The Object First
Whenever you're about to select something with the Pen Tool, before you begin, take a moment to examine the object carefully to get a sense of where you're going to need to place your anchor points. Forget about all the details in the object and focus only on its shape. Where are the areas where the shape changes direction? Which parts of the shape are straight? Which parts are curved? If there's a curve, is it a smooth, continuous arc or does the angle change at a spot along the curve? Visualize in your mind where you're going to need to place your anchor points, because when you place one, you always want to be thinking about the next one and what the path segment between the two points needs to look like.
A Tool Of Elegance
One more thing to keep in mind is that the Pen Tool is meant to be a tool of elegance . It's not a nail gun or a staple gun. You don't want to just go clicking around your shape adding anchor points all "willy nilly" (that's a technical term). When using it to draw curves, you want those curves to be nice and smooth, otherwise we might as well just stick with the Lasso Tool. To keep the curves flowing smoothly, we need to limit the number of anchor points we use to create them. That's why you want to take a moment to examine the object first and visualize where the anchor points need to be. If you can outline a large section of the shape using only one curve with an anchor point on either end, that's what you want to do, because that's what's going to give you the kind of results you're looking for. The kind of results that scream "definitely not an amateur!".
Let's select these dolphins. I'm going to start my path in the middle of the photo, at the spot where the side of the dolphin on the left overlaps the rear flipper of the dolphin on the right. There's no right or wrong place to begin a path. This is just where I've decided to start. The first part of that rear flipper is straight, so since I don't need a direction handle to create a straight path segment, I'm simply going to click once with my Pen Tool to add my first anchor point, which will serve as the starting point for my path:
Adding the first anchor point.
As I mentioned earlier, you'll probably find it helpful to zoom in on your image as you're drawing your path. To scroll the image around on the screen as you're zoomed in, hold down the spacebar, which will switch you temporarily to the Hand Tool and allow you to move the image around on the screen by clicking and dragging it.
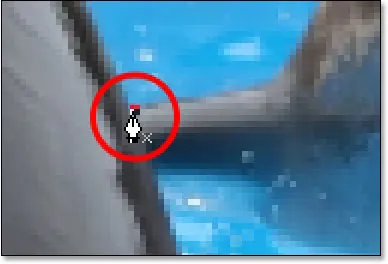
The top of that flipper actually has a slight curve to it as it approaches the dolphin's tail section, so for my second anchor point, I'm going to click at the point where the flipper and tail section meet, and I'm going to drag out short direction handles, dragging up and to the right in the direction that the tail section is moving. Notice that I've now created a slight curve along the flipper:
Adding the second anchor point and dragging out small direction handles to add a slight curve to the first path segment.
As I continue up along the tail, I can see that it stays straight for a short distance, followed by a curve to the right, so I'm going to click to add a third anchor point at the spot where the curve begins. This gives me a straight path segment between the previous point and the new one. I know there's a short direction handle extending out from the previous anchor point, which normally means that my new path segment will be a curve, not a straight section, but because the handle is so short and is also moving in the same direction as the path segment, there is no noticeable curve to it. Consider it a "mostly straight" path segment:
Clicking to add the third anchor point, creating a (mostly) straight path segment.
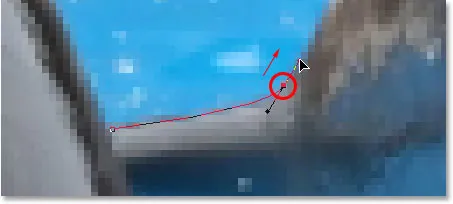
Continuing along, we come to the first real curve in our path. For this, I'm going to need to drag out a direction handle from the anchor point I just added, so I'm going to hold down Alt (Win) / Option (Mac), then drag out a handle in the general direction where I want the curve to flow as it starts. Notice how I'm only dragging out a handle from the one side of the anchor point, not both:
Hold "Alt" (Win) / "Option" (Mac) to drag out a direction handle from one side of an anchor point.
To add the curve, I'll click and drag at the spot where the curve ends, shaping the curve as I drag out the handles until it matches the curve of the dolphin's tail. If I needed to, I could also go back and change the length and direction of the handle at the start of the curve to fine-tune it, but in this case, I don't need to do that:
Adding an anchor point at the opposite end of the curve and dragging out direction handles from it, rotating and resizing them as needed until the curve matches the curve of the object.
The next area of the dolphin is pretty straight, right up until its back begins to merge with its dorsal fin, at which point there's another curve, so I'm going to click to add an anchor point just before the curve up the dorsal fin begins, which is going to give me another "mostly straight" path segment between the previous point and the new point. Then I'm going to once again hold down Alt (Win) / Option (Mac) and drag out a direction handle as I prepare for my next path segment which will be curved:
Click to add an anchor point, then hold down "Alt" (Win) / "Option" (Mac) and drag out a direction handle to prepare for the next path segment.
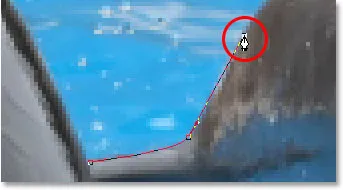
The left side of the dorsal fin consists mainly of one continuous curve upward until it gets near the very top, at which point the shape changes, so to create this curve, I'm going to click and drag at the point near the top where the curve will change direction. As we can see in the screenshot, this adds a curved path segment between the previous anchor point and the new one, but the curve is not yet following along the shape of the fin. It's going to need some fine-tuning:
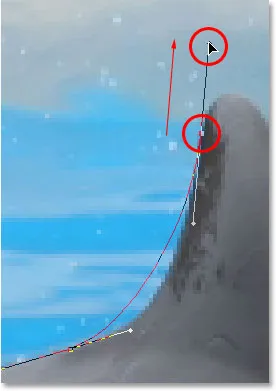
Adding a curve along the left side of the dorsal fin. The curve still needs some adjusting.
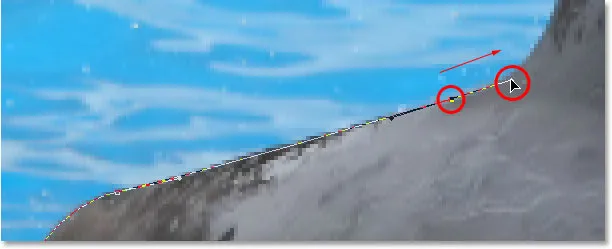
To adjust the curve, I'm simply going to hold down the Ctrl (Win) / Command (Mac) key, which gives me temporary access to the Direct Selection Tool, and I'm going to drag the handle extending out from the bottom anchor point towards the right to lengthen it, which is going to pull the angle of the curve in towards the right along with it, lining it up nicely with the curve of the fin. I've also rotated the top direction handles slightly in a clockwise direction just to be nit-picky, but the majority of the adjustment was done using the bottom direction handle:
Adjust the curve by adjusting its direction handles.
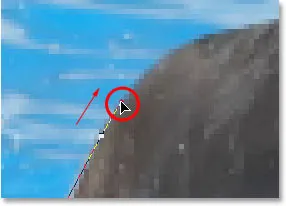
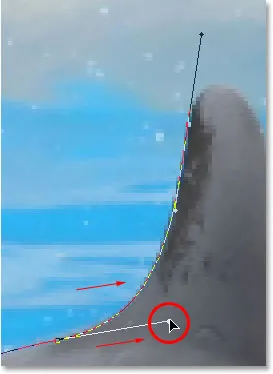
To add a curve around the top of the fin, I'll click and drag on the opposite side of it to add another anchor point with short direction handles. Notice though that we run into a bit of a problem. The direction handle on the left side of the curve is too long and it's pulling the curve away from the top of the fin:
The direction handle on the left of the curve is too long, resulting in the curve not following the shape of the fin.
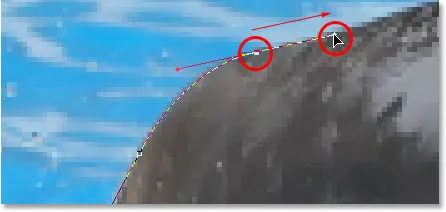
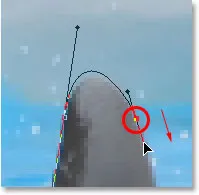
To fix that, all I need to do is once again hold down Ctrl (Win) / Command (Mac), then click on the end of the handle to select it and drag it shorter until the curve is the proper shape:
Shortening the length of the direction handle to adjust the shape of the curve.
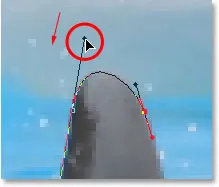
Let's finish creating our path around the dorsal fin. The remainder of the fin is basically a straight line, so I'm going to click at the base of the fin to add another anchor point which adds the straight path segment, completing our path around the fin:
Adding an anchor point at the base of the fin to finish drawing the path around it.
Since you and I would both be here all day if I was to continue commenting on every anchor point, direction handle and path segment as we make our way slowly around the dolphins, and since we've covered everything we need to know at this point, I'm going to go ahead and draw the rest of the path, outlining both dolphins:
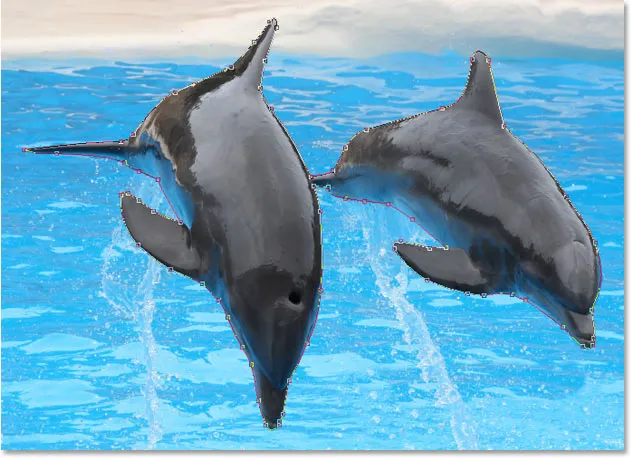
Both dolphins are now outlined by the path.
The dolphins have now been outlined with the path, and if we look at the Paths palette, we can see that sure enough, we have a path in the shape of the dolphins:
Photoshop's Paths palette showing the outline of the dolphins in the preview thumbnail.
As we've learned, Photoshop automatically names the path "Work Path", which means it's temporary and will be replaced if we start a new path. If you wanted to save it, you would need to double-click on the name "Work Path" and rename it to something else, like "Dolphins" in this case. I'm not going to worry about that, since I have no need to save it. All I want to do at this point is convert my path into a selection, and since I'm already in the Paths palette, I'll do that by clicking on the Load path as selection icon at the bottom of the palette:
Clicking the "Load path as selection" icon at the bottom of the Paths palette.
I could also have used the keyboard shortcut Ctrl+Enter (Win) / Command+Return (Mac) . Either way converts my path into a selection, and if I look at my photo, I can see that my path has indeed become a selection around the dolphins:

The path around the dolphins has now been converted into a selection.
Où aller ensuite …
Et nous l'avons là! The dolphins are now selected and ready for whatever plans we have for them. And with that, we wrap up our look at drawing paths and making selections with the Pen Tool in Photoshop! Pour en savoir plus sur les outils de sélection de Photoshop, consultez notre rubrique Comment effectuer des sélections dans la série Photoshop. Visitez notre section Bases de Photoshop pour plus de sujets sur Photoshop!